
Struktur:
05ab7453ec
arm-dac-work
audio_out
better_chibios_wait
changelog
chibios-contrib-update
cmake-experiments
connection-keycodes
deploy-toolchains
develop
docusaurus
edez2
eeprom_update
encoder_matrix
fix/just_return_false
gb_port
gc_switch
generate_api_layouts
gh-pages
hidlamp
invert_encodermap_enable
json_audio
json_custom_keycodes
keyboard_overrides
kle2json_hyper
led_matrix_direct
list_maintainers
make_cli_parsing
master
more_dd_eeprom
muon_light
muon_light_dc
peasy
peb
planck-ez-a5-high
planck_ez_wdg
planck_ez_with_5372
planck_light_rev2
planck_thk
potentiometer
pre-develop-merge-nov20
python_optimizations
qmk_compile_build_keyboard
qmk_compile_improvements
qwiic_hub
qwiic_hud
refactor_process_record_kb_user
revert-17693-fix/pmw33xx-correct-angle-tune
rgb7seg
riot
subatomic
subatomic_encoders
subvendor_ids
titmlb
unorthodox
venv-script
xap
xmega_support
0.33.13
0.33.12
0.33.11
0.33.10
0.33.9
0.33.8
0.33.7
0.33.6
0.33.5
0.33.4
0.33.3
0.33.2
0.33.1
breakpoint_2026_05_31
0.33.0
0.32.16
0.32.15
0.32.14
0.32.13
0.32.12
0.32.11
0.32.10
0.32.9
0.32.8
0.32.7
0.32.6
0.32.5
0.32.4
0.32.3
0.32.2
0.32.1
breakpoint_2026_03_08
0.32.0
0.31.12
0.31.11
0.31.10
0.31.9
0.31.8
0.31.7
0.31.6
0.31.5
0.31.4
0.31.3
0.31.2
0.31.1
breakpoint_2025_11_30
0.31.0
0.30.15
0.30.14
0.30.13
0.30.12
0.30.11
0.30.10
0.30.9
0.30.8
0.30.7
0.30.6
0.30.5
0.30.4
0.30.3
0.30.2
0.30.1
breakpoint_2025_08_31
0.30.0
0.29.12
0.29.11
0.29.10
0.29.9
0.29.8
0.29.7
0.29.6
0.29.5
0.29.4
0.29.3
0.29.2
0.29.1
breakpoint_2025_05_25
0.29.0
0.28.10
0.28.9
0.28.8
0.28.7
0.28.6
0.28.5
0.28.4
0.28.3
0.28.2
0.28.1
breakpoint_2025_02_23
0.28.0
0.27.13
0.27.12
0.27.11
0.27.10
0.27.9
0.27.8
0.27.7
0.27.6
0.27.5
0.27.4
0.27.3
0.27.2
0.27.1
breakpoint_2024_11_24
0.27.0
0.26.11
0.26.10
0.26.9
0.26.8
0.26.7
0.26.6
0.26.5
0.26.4
0.26.3
0.26.2
0.26.1
breakpoint_2024_08_25
0.26.0
via-keymaps-still-present
0.25.22
0.25.21
0.25.20
0.25.19
0.25.18
0.25.17
0.25.16
0.25.15
0.25.14
0.25.13
0.25.12
0.25.11
0.25.10
0.25.9
0.25.8
0.25.7
0.25.6
0.25.5
0.25.4
0.25.3
0.25.2
0.25.1
breakpoint_2024_05_26
0.25.0
0.24.11
0.24.10
0.24.9
0.24.8
0.24.7
0.24.6
0.24.5
0.24.4
0.24.3
0.24.2
0.24.1
breakpoint_2024_02_25
0.24.0
0.23.9
0.23.8
0.23.7
0.23.6
0.23.5
0.23.4
0.23.3
0.23.2
0.23.1
breakpoint_2023_11_26
0.23.0
user-keymaps-still-present
0.22.14
0.22.13
0.22.12
0.22.11
0.22.10
0.22.9
0.22.8
0.22.7
0.22.6
0.22.5
0.22.4
0.22.3
0.22.2
0.22.1
breakpoint_2023_08_27
0.22.0
0.21.7
0.21.6
0.21.5
0.21.4
0.21.3
0.21.2
0.21.1
breakpoint_2023_05_28
0.21.0
0.20.8
0.20.7
0.20.6
0.20.5
0.20.4
0.20.3
0.20.2
0.20.1
breakpoint_2023_02_26
0.20.0
0.19.12
0.19.11
0.19.10
0.19.9
0.19.8
0.19.7
0.19.6
0.19.5
0.19.4
0.19.3
0.19.2
0.19.1
breakpoint_2022_11_26
0.19.0
0.18.17
0.18.16
0.18.15
0.18.14
0.18.13
0.18.12
0.18.11
0.18.10
0.18.9
0.18.8
0.18.7
0.18.6
0.18.5
0.18.4
0.18.3
0.18.2
0.18.1
breakpoint_2022_08_27
0.18.0
0.17.9
0.17.8
0.17.7
0.17.6
0.17.5
0.17.4
0.17.3
0.17.2
0.17.1
breakpoint_2022_05_28
0.17.0
0.16.9
0.16.8
0.16.7
0.16.6
0.16.5
0.16.4
0.16.3
0.16.2
0.16.1
0.16.0
0.15.25
0.15.24
0.15.23
0.15.22
0.15.21
0.15.20
0.15.19
0.15.18
0.15.17
0.15.16
0.15.15
0.15.14
0.15.13
0.15.12
0.15.11
0.15.10
0.15.9
0.15.8
0.15.7
0.15.6
0.15.5
0.15.4
0.15.3
0.15.2
0.15.1
0.15.0
0.14.33
breakpoint_2021_11_27
0.14.32
0.14.31
0.14.30
0.14.29
0.14.28
0.14.27
0.14.26
0.14.25
0.14.24
0.14.23
0.14.22
0.14.21
0.14.20
0.14.19
0.14.18
0.14.17
0.14.16
0.14.15
0.14.14
0.14.13
0.14.12
0.14.11
0.14.10
0.14.9
0.14.8
0.14.7
0.14.6
0.14.5
0.14.4
0.14.3
0.14.2
0.14.1
0.14.0
breakpoint_2021_08_28
0.13.38
0.13.37
0.13.36
0.13.35
0.13.34
0.13.33
0.13.32
0.13.31
0.13.30
0.13.29
0.13.28
0.13.27
0.13.26
0.13.25
0.13.24
0.13.23
0.13.22
0.13.21
0.13.20
0.13.19
0.13.18
0.13.17
0.13.16
0.13.15
0.13.14
0.13.13
0.13.12
0.13.11
0.13.10
0.13.9
0.13.8
0.13.7
0.13.6
0.13.5
0.13.4
0.13.3
0.13.2
0.13.1
0.12.52
0.13.0
0.12.51
0.12.50
0.12.49
0.12.48
0.12.47
0.12.46
0.12.45
0.12.44
0.12.43
0.12.42
0.12.41
0.12.40
0.12.39
0.12.38
0.12.37
0.12.36
0.12.35
0.12.34
0.12.33
0.12.32
0.12.31
0.12.30
0.12.29
0.12.28
0.12.27
0.12.26
0.12.25
0.12.24
0.12.23
0.12.22
0.12.21
0.12.20
0.12.19
0.12.18
0.12.17
0.12.16
0.12.15
0.12.14
0.12.13
0.12.12
0.12.11
0.12.10
0.12.9
0.12.8
0.12.7
0.12.6
0.12.5
0.12.4
0.12.3
0.12.2
0.12.1
breakpoint_2021_05_29
0.11.70
0.12.0
0.11.69
0.11.68
0.11.67
0.11.66
0.11.65
0.11.64
0.11.63
0.11.62
0.11.61
0.11.60
0.11.59
0.11.58
0.11.57
0.11.56
0.11.55
0.11.54
0.11.53
0.11.52
0.11.51
0.11.50
0.11.49
0.11.48
0.11.47
0.11.46
0.11.45
0.11.44
0.11.43
0.11.42
0.11.41
0.11.40
0.11.39
0.11.38
0.11.37
0.11.36
0.11.35
0.11.34
0.11.33
0.11.32
0.11.31
0.11.30
0.11.29
0.11.28
0.11.27
0.11.26
0.11.25
0.11.24
0.11.23
0.11.22
0.11.21
0.11.20
0.11.19
0.11.18
0.11.17
0.11.16
0.11.15
0.11.14
0.11.13
0.11.12
0.11.11
0.11.10
0.11.9
0.11.8
0.11.7
0.11.6
0.11.5
0.11.4
0.11.3
0.11.1
0.11.2
0.11.0
0.10.54
0.10.53
0.10.52
0.10.51
0.10.50
0.10.49
0.10.48
0.10.47
0.10.46
0.10.45
0.10.44
0.10.43
0.10.42
0.10.41
0.10.40
0.10.39
0.10.37
0.10.38
0.10.36
0.10.34
0.10.35
0.10.33
0.10.32
0.10.31
0.10.30
0.10.29
0.10.28
0.10.27
0.10.26
0.10.25
0.10.24
0.10.22
0.10.23
0.10.21
0.10.20
0.10.19
0.10.18
0.10.17
0.10.16
0.10.15
0.10.14
0.10.13
0.10.12
0.10.11
0.10.10
0.10.9
0.10.8
0.10.7
0.10.6
0.10.5
0.10.4
0.10.3
0.10.2
0.10.1
0.10.0
0.9.59
0.9.58
0.9.57
0.9.56
0.9.55
0.9.54
0.9.53
0.9.52
0.9.51
0.9.50
0.9.49
0.9.48
0.9.47
0.9.46
0.9.45
0.9.44
0.9.43
0.9.42
0.9.41
0.9.39
0.9.40
0.9.38
0.9.37
0.9.36
0.9.35
0.9.34
0.9.33
0.9.32
0.9.31
0.9.30
0.9.29
0.9.28
0.9.27
0.9.26
0.9.25
0.9.24
0.9.23
0.9.22
0.9.21
0.9.20
0.9.19
0.9.18
0.9.17
0.9.16
0.9.15
0.9.14
0.9.13
0.9.12
0.9.11
0.9.10
0.9.9
0.9.8
0.9.7
0.9.6
0.9.5
0.9.4
0.9.3
0.9.2
0.9.1
0.9.0
0.8.192
0.8.191
0.8.190
0.8.189
0.8.188
0.8.187
0.8.186
0.8.185
0.8.183
0.8.184
0.8.182
0.8.181
0.8.179
0.8.180
0.8.178
0.8.177
0.8.175
0.8.176
0.8.174
0.8.173
0.8.172
0.8.171
0.8.168
0.8.170
0.8.169
0.8.167
0.8.166
0.8.165
0.8.164
0.8.163
0.8.162
0.8.161
0.8.160
0.8.159
0.8.158
0.8.157
0.8.156
0.8.154
0.8.155
0.8.153
0.8.152
0.8.151
0.8.150
0.8.149
0.8.148
0.8.147
0.8.146
0.8.145
0.8.144
0.8.143
0.8.142
0.8.141
0.8.140
0.8.139
0.8.138
0.8.137
0.8.136
0.8.135
0.8.134
0.8.133
0.8.132
0.8.131
0.8.130
0.8.126
0.8.127
0.8.128
0.8.129
0.8.125
0.8.124
0.8.123
0.8.122
0.8.121
0.8.120
0.8.118
0.8.119
0.8.117
0.8.116
0.8.115
0.8.114
0.8.113
0.8.112
0.8.111
0.8.110
0.8.109
0.8.108
0.8.107
0.8.106
0.8.105
0.8.104
0.8.103
0.8.102
0.8.101
0.8.100
0.8.98
0.8.99
0.8.97
0.8.96
0.8.95
0.8.94
0.8.93
0.8.92
0.8.91
0.8.90
0.8.89
0.8.85
0.8.86
0.8.87
0.8.88
0.8.84
0.8.83
0.8.82
0.8.81
0.8.80
0.8.79
0.8.78
0.8.77
0.8.76
0.8.74
0.8.75
0.8.73
0.8.72
0.8.71
0.8.70
0.8.69
0.8.68
0.8.67
0.8.66
0.8.65
0.8.64
0.8.63
0.8.62
0.8.61
0.8.59
0.8.60
0.8.58
0.8.57
0.8.56
0.8.55
0.8.54
0.8.53
0.8.52
0.8.51
0.8.49
0.8.50
0.8.48
0.8.47
0.8.46
0.8.44
0.8.45
0.8.42
0.8.43
0.8.41
0.8.40
0.8.39
0.8.38
0.8.37
0.8.36
0.8.35
0.8.34
0.8.33
0.8.32
0.8.31
0.8.30
0.8.29
0.8.28
0.8.27
0.8.26
0.8.25
0.8.24
0.8.23
0.8.22
0.8.21
0.8.20
0.8.19
0.8.18
0.8.17
0.8.16
0.8.15
0.8.14
0.8.13
0.8.12
0.8.11
0.8.10
0.8.9
0.8.8
0.8.7
0.8.6
0.8.4
0.8.5
0.8.3
0.8.2
0.8.1
0.8.0
0.7.172
0.7.171
0.7.170
0.7.169
0.7.168
0.7.167
0.7.166
0.7.165
0.7.164
0.7.163
0.7.162
0.7.161
0.7.160
0.7.159
0.7.158
0.7.157
0.7.156
0.7.155
0.7.154
0.7.153
0.7.152
0.7.151
0.7.150
0.7.149
0.7.148
0.7.147
0.7.146
0.7.145
0.7.144
0.7.143
0.7.142
0.7.141
0.7.140
0.7.139
0.7.138
0.7.137
0.7.136
0.7.135
0.7.134
0.7.133
0.7.132
0.7.131
0.7.130
0.7.129
0.7.128
0.7.127
0.7.126
0.7.125
0.7.124
0.7.123
0.7.122
0.7.121
0.7.120
0.7.119
0.7.118
0.7.117
0.7.116
0.7.115
0.7.114
0.7.113
0.7.112
0.7.111
0.7.110
0.7.109
0.7.108
0.7.107
breakpoint_2020_02_29
0.7.106
0.7.105
0.7.104
0.7.103
0.7.102
0.7.101
0.7.100
0.7.99
0.7.98
0.7.97
0.7.96
0.7.95
0.7.94
0.7.93
0.7.92
0.7.91
0.7.90
0.7.89
0.7.88
0.7.87
0.7.86
0.7.85
0.7.84
0.7.83
0.7.82
0.7.81
0.7.80
0.7.79
0.7.78
0.7.77
0.7.75
0.7.76
0.7.74
0.7.73
0.7.72
0.7.71
0.7.70
0.7.67
0.7.68
0.7.69
0.7.66
0.7.65
0.7.64
0.7.63
0.7.62
0.7.61
0.7.60
0.7.59
0.7.57
0.7.58
0.7.56
0.7.54
0.7.55
0.7.53
0.7.52
0.7.51
0.7.50
0.7.49
0.7.48
0.7.47
0.7.46
0.7.45
0.7.44
0.7.43
0.7.42
0.7.41
0.7.40
0.7.39
0.7.38
0.7.37
0.7.36
0.7.35
0.7.34
0.7.33
0.7.32
0.7.31
0.7.30
0.7.29
0.7.28
0.7.27
0.7.26
0.7.25
0.7.24
0.7.22
breakpoint_2019_11_30
0.7.23
0.7.21
0.7.20
0.7.19
0.7.18
0.7.17
0.7.16
0.7.15
0.7.14
0.7.13
0.7.12
0.7.11
0.7.10
0.7.9
0.7.8
0.7.7
0.7.6
0.7.5
0.7.4
0.7.3
0.7.2
0.7.1
0.6.464
0.7.0
0.6.463
0.6.462
0.6.461
0.6.460
0.6.459
0.6.458
0.6.457
0.6.456
0.6.455
0.6.454
0.6.453
0.6.452
0.6.451
0.6.450
drop-1.0.0
0.6.449
0.6.448
0.6.447
0.6.446
0.6.445
0.6.444
0.6.443
0.6.442
0.6.441
0.6.440
0.6.439
0.6.438
0.6.437
0.6.436
0.6.435
0.6.434
0.6.433
0.6.432
0.6.431
0.6.430
0.6.429
0.6.428
0.6.427
0.6.426
0.6.425
0.6.424
0.6.423
0.6.422
0.6.421
0.6.420
0.6.419
0.6.418
0.6.417
0.6.416
0.6.415
0.6.414
0.6.413
0.6.412
0.6.411
0.6.410
0.6.409
0.6.408
0.6.407
breakpoint_2019_08_30
0.6.406
0.6.405
0.6.404
0.6.403
0.6.402
0.6.401
0.6.400
0.6.399
0.6.398
0.6.397
0.6.396
0.6.395
0.6.394
0.6.393
0.6.392
0.6.391
0.6.390
0.6.389
0.6.388
0.6.387
0.6.386
0.6.385
0.6.384
0.6.383
0.6.382
0.6.380
0.6.381
0.6.379
0.6.377
0.6.378
0.6.376
0.6.375
0.6.374
0.6.373
0.6.372
0.6.371
0.6.370
0.6.369
0.6.368
0.6.367
0.6.366
0.6.365
0.6.364
0.6.363
0.6.362
0.6.361
0.6.360
0.6.359
0.6.358
0.6.357
0.6.356
0.6.355
0.6.354
0.6.353
0.6.352
0.6.351
0.6.350
0.6.349
0.6.348
0.6.347
0.6.346
0.6.345
0.6.343
0.6.344
0.6.342
0.6.341
0.6.340
0.6.339
0.6.338
0.6.337
0.6.336
0.6.335
0.6.334
0.6.333
0.6.332
0.6.331
0.6.330
0.6.329
0.6.328
0.6.327
0.6.326
0.6.325
0.6.324
0.6.323
0.6.322
0.6.321
0.6.320
0.6.319
0.6.318
0.6.317
0.6.316
0.6.315
0.6.314
0.6.313
0.6.312
0.6.311
0.6.310
0.6.309
0.6.308
0.6.307
0.6.306
0.6.305
0.6.304
0.6.303
0.6.302
0.6.301
0.6.300
0.6.299
0.6.298
0.6.297
0.6.296
0.6.295
0.6.294
0.6.293
0.6.292
0.6.291
0.6.290
0.6.289
0.6.288
0.6.287
0.6.286
0.6.285
0.6.284
0.6.283
0.6.282
0.6.281
0.6.280
0.6.279
0.6.278
0.6.277
0.6.276
0.6.275
0.6.274
0.6.273
0.6.272
0.6.271
0.6.270
0.6.269
0.6.268
0.6.267
0.6.266
0.6.265
0.6.264
0.6.263
0.6.262
0.6.261
0.6.260
0.6.259
0.6.258
0.6.257
0.6.256
0.6.255
0.6.254
0.6.253
0.6.252
0.6.251
0.6.250
0.6.249
0.6.248
0.6.247
0.6.246
0.6.245
0.6.244
0.6.243
0.6.242
0.6.241
0.6.240
0.6.239
0.6.238
0.6.237
0.6.236
0.6.235
0.6.234
0.6.233
0.6.232
0.6.231
0.6.230
0.6.229
0.6.228
0.6.227
0.6.226
0.6.225
0.6.224
0.6.223
0.6.222
0.6.221
0.6.220
0.6.219
0.6.218
0.6.217
0.6.216
0.6.215
0.6.214
0.6.213
0.6.212
0.6.211
0.6.210
0.6.209
0.6.207
0.6.208
0.6.206
0.6.205
0.6.204
0.6.203
0.6.202
0.6.201
0.6.200
0.6.199
0.6.198
0.6.197
0.6.196
0.6.195
0.6.194
0.6.193
0.6.192
0.6.191
0.6.190
0.6.189
0.6.188
0.6.187
0.6.186
0.6.185
0.6.184
0.6.183
0.6.182
0.6.181
0.6.180
0.6.179
0.6.178
0.6.176
0.6.177
0.6.175
0.6.174
0.6.173
planck-6.1
0.6.172
0.6.171
0.6.170
0.6.169
0.6.168
0.6.167
0.6.166
0.6.165
0.6.164
0.6.163
0.6.162
0.6.161
0.6.160
0.6.159
0.6.158
0.6.157
0.6.156
0.6.155
0.6.154
0.6.153
0.6.152
0.6.151
0.6.150
0.6.149
0.6.148
0.6.147
0.6.146
0.6.145
0.6.144
0.6.143
0.6.142
0.6.141
0.6.140
0.6.139
0.6.138
0.6.137
0.6.136
0.6.135
0.6.134
0.6.133
0.6.132
0.6.131
0.6.130
0.6.129
0.6.128
0.6.126
0.6.127
0.6.125
0.6.124
0.6.123
0.6.122
0.6.121
0.6.120
0.6.119
0.6.118
0.6.117
0.6.116
0.6.115
0.6.114
0.6.113
0.6.112
0.6.111
0.6.110
0.6.109
0.6.108
0.6.107
0.6.106
0.6.105
0.6.104
0.6.103
0.6.102
0.6.101
0.6.100
0.6.99
0.6.98
0.6.97
0.6.96
0.6.95
0.6.94
0.6.93
0.6.92
0.6.91
0.6.90
0.6.89
0.6.87
0.6.88
0.6.86
0.6.85
0.6.84
0.6.83
0.6.82
0.6.81
0.6.80
0.6.79
0.6.78
0.6.77
0.6.76
0.6.75
0.6.74
0.6.73
0.6.72
0.6.71
0.6.70
0.6.69
planck-6.0
0.6.68
0.6.67
0.6.66
0.6.65
0.6.64
0.6.63
0.6.62
0.6.61
0.6.60
0.6.59
0.6.58
0.6.57
0.6.56
0.6.54
0.6.55
0.6.53
0.6.52
0.6.50
0.6.51
0.6.49
0.6.48
0.6.47
0.6.46
0.6.45
0.6.44
0.6.43
0.6.42
0.6.41
0.6.40
0.6.39
0.6.38
0.6.37
0.6.36
0.6.35
0.6.34
0.6.33
0.6.32
0.6.31
0.6.30
0.6.29
0.6.28
0.6.27
0.6.26
0.6.25
planck-light-1.0
0.6.24
0.6.23
0.6.22
0.6.21
0.6.20
0.6.19
0.6.18
0.6.17
0.6.16
0.6.15
0.6.14
0.6.13
0.6.12
0.6.11
0.6.10
0.6.9
0.6.8
0.6.7
0.6.6
0.6.5
0.6.4
0.6.3
0.6.2
0.6.1
0.6.0
0.5.264
0.5.263
0.5.262
0.5.261
0.5.260
0.5.256
0.5.257
0.5.258
0.5.259
0.5.254
0.5.255
0.5.253
0.5.252
0.5.251
0.5.250
0.5.249
0.5.248
0.5.247
0.5.246
0.5.245
0.5.244
0.5.243
0.5.242
0.5.241
0.5.240
0.5.239
0.5.238
0.5.237
0.5.236
0.5.235
0.5.234
0.5.233
0.5.232
0.5.231
0.5.230
0.5.229
0.5.228
0.5.227
0.5.226
0.5.225
0.5.224
0.5.223
0.5.222
0.5.221
0.5.220
0.5.219
0.5.218
0.5.217
0.5.216
0.5.215
0.5.214
0.5.213
0.5.212
0.5.211
0.5.210
0.5.209
0.5.208
0.5.207
0.5.206
0.5.205
0.5.204
0.5.203
0.5.201
0.5.202
0.5.200
0.5.199
0.5.198
0.5.197
0.5.196
0.5.195
0.5.193
0.5.194
0.5.192
0.5.191
0.5.190
0.5.189
0.5.188
0.5.187
0.5.185
0.5.186
0.5.184
0.5.183
0.5.182
0.5.181
0.5.180
0.5.179
0.5.178
0.5.177
0.5.176
0.5.175
0.5.174
0.5.173
0.5.172
0.5.171
0.5.170
0.5.169
0.5.168
0.5.167
0.5.165
0.5.166
0.5.164
0.5.163
0.5.162
0.5.161
0.5.160
0.5.159
planck-5.0
preonic-2.0
0.5.156
0.5.157
0.5.158
0.5.155
0.5.154
0.5.153
0.5.152
0.5.151
0.5.150
0.5.149
0.5.148
0.5.147
0.5.145
0.5.146
0.5.144
0.5.143
0.5.142
0.5.141
0.5.140
0.5.139
0.5.138
0.5.137
0.5.136
0.5.135
0.5.134
0.5.133
0.5.132
0.5.131
0.5.130
0.5.129
0.5.128
0.5.127
0.5.126
0.5.125
0.5.124
0.5.123
0.5.122
planck-4.2
0.5.121
0.5.120
0.5.119
0.5.118
0.5.117
0.5.116
0.5.115
0.5.114
0.5.113
0.5.112
0.5.111
0.5.110
0.5.109
0.5.108
0.5.107
0.5.106
0.5.105
0.5.104
0.5.103
0.5.102
0.5.101
0.5.100
0.5.99
0.5.98
0.5.97
0.5.96
0.5.95
0.5.94
0.5.93
0.5.92
0.5.91
0.5.90
0.5.89
0.5.88
0.5.87
0.5.86
0.5.85
0.5.84
0.5.83
0.5.82
0.5.81
0.5.80
0.5.79
0.5.78
0.5.77
0.5.76
0.5.75
0.5.74
0.5.73
0.5.72
0.5.71
0.5.70
0.5.68
0.5.69
0.5.67
0.5.66
0.5.65
0.5.64
0.5.63
0.5.62
0.5.61
0.5.60
0.5.59
0.5.58
0.5.57
0.5.56
0.5.55
0.5.54
0.5.53
0.5.52
0.5.51
0.5.50
0.5.49
0.5.48
0.5.47
0.5.46
0.5.45
0.5.44
0.5.43
0.5.42
0.5.41
LUFA-170418
0.5.40
0.5.39
0.5.38
0.5.37
0.5.36
0.5.35
0.5.34
0.5.33
0.5.32
0.5.31
0.5.30
0.5.29
0.5.28
0.5.27
0.5.26
0.5.25
0.5.24
0.5.23
0.5.22
0.5.21
0.5.20
0.5.17
0.5.16
0.5.15
0.5.14
0.5.13
0.5.12
0.5.11
0.5.10
0.5.9
0.5.8
0.5.7
0.5.6
0.5.5
0.5.4
0.5.3
0.5.2
0.5.1
0.5.0
ergodox_ez-161205
planck-4.1
preonic-1.0
planck-4.0
v4.0
LUFA-151115
LUFA-140928
LUFA-140302
gh60-0.1
LUFA-130901
LUFA-130901-BETA
LUFA-111009
 MakotoKurauchi
bdd1f318c3
[Keyboard] New kbd 1k (#15509)
MakotoKurauchi
bdd1f318c3
[Keyboard] New kbd 1k (#15509)
|
vor 4 Jahren | |
|---|---|---|
| .. | ||
| keymaps | bdd1f318c3 [Keyboard] New kbd 1k (#15509) | vor 4 Jahren |
| 1k.c | bdd1f318c3 [Keyboard] New kbd 1k (#15509) | vor 4 Jahren |
| 1k.h | bdd1f318c3 [Keyboard] New kbd 1k (#15509) | vor 4 Jahren |
| config.h | bdd1f318c3 [Keyboard] New kbd 1k (#15509) | vor 4 Jahren |
| info.json | bdd1f318c3 [Keyboard] New kbd 1k (#15509) | vor 4 Jahren |
| readme.md | bdd1f318c3 [Keyboard] New kbd 1k (#15509) | vor 4 Jahren |
| rules.mk | bdd1f318c3 [Keyboard] New kbd 1k (#15509) | vor 4 Jahren |
readme.md
1k
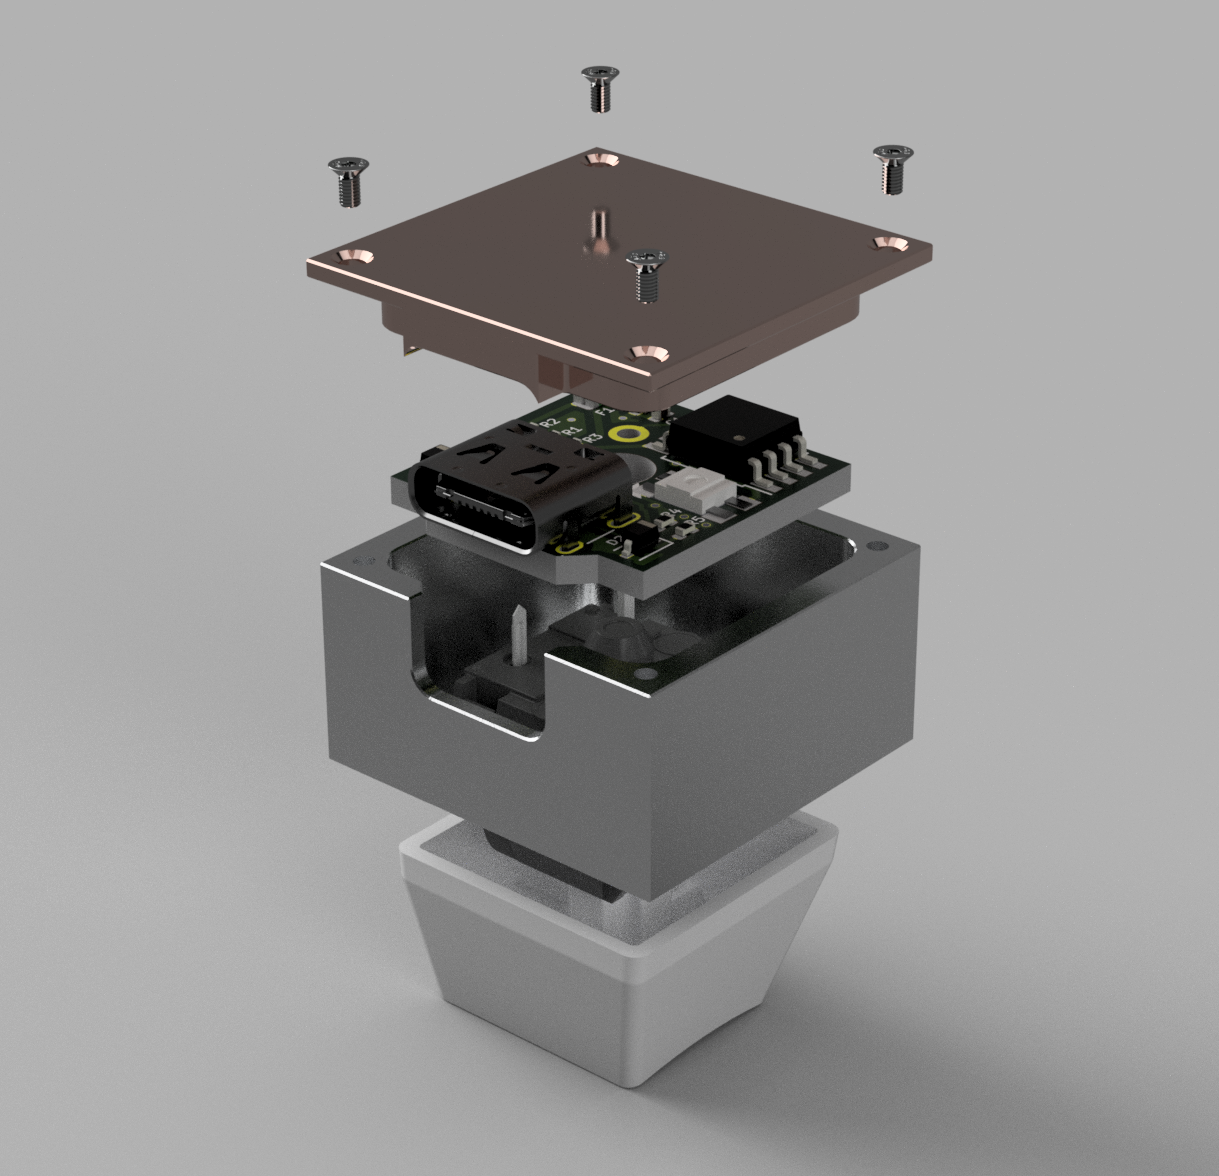
1% Custom mechanical keyboard. ATtiny85 powered, with 1*WS2812 LED, and the micronucleus bootloader.
Note: Due to limited firmware space, a lot of features have to be disabled to get a functioning QMK based keyboard.
- Keyboard Maintainer: MakotoKurauchi
- Hardware Supported: 1k
- Hardware Availability: booth
Make example for this keyboard (after setting up your build environment):
make 1k:default
See the build environment setup and the make instructions for more information. Brand new to QMK? Start with our Complete Newbs Guide.
Flashing
Prerequisites
git clone https://github.com/micronucleus/micronucleus.git
cd micronucleus/commandline/
sudo make install
On Linux, you’ll need proper privileges to access the MCU. You can either use sudo when flashing firmware, or place these files in /etc/udev/rules.d/. Once added run the following:
sudo udevadm control --reload-rules
sudo udevadm trigger
Instructions
make 1k:default:flash

# or directly with...
micronucleus --run <firmware.hex>